
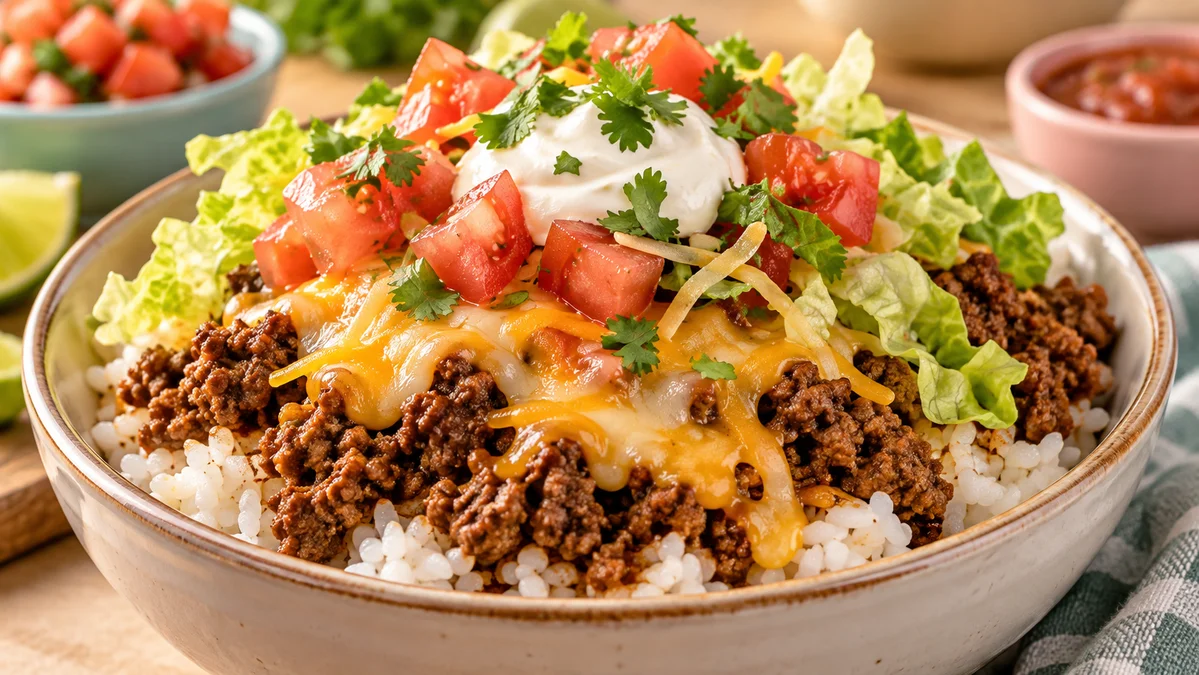
This Taco Rice Bowl is ready in under 30 minutes, packed with seasoned ground beef, rice, veggies, and toppings. A quick healthy weeknight dinner idea!
Ingredients
Instructions
Begin by gathering every ingredient and prepping your workspace like a taco night assembly line. Rinse the rice in a fine-mesh strainer under cool running water for 30 to 45 seconds, until the water runs mostly clear. This removes excess surface starch, which is the single biggest cause of sticky, gummy rice. While the rice drains, dice the onion, mince the garlic, quarter the cherry tomatoes, shred the lettuce, shred the cheese, slice the avocado, chop the cilantro, and cut the lime into wedges. Set out the sour cream or Greek yogurt, salsa, black beans, and corn. Why this matters: once the stove is hot, taco night moves fast, and having everything within arm’s reach prevents burnt garlic and overcooked beef. The sensory cue is a colorful, organized taco bar on your counter. One pitfall: do not rinse rice directly in the cooking pot; use a strainer so you do not accidentally add too much water. If using pre-shredded cheese, know that it melts less smoothly because of anti-caking starch, but it still works beautifully in a bowl.
Cook the rice. In a medium saucepan with a tight-fitting lid, combine the rinsed rice, water or low-sodium beef broth, 1/2 teaspoon kosher salt, and 1 tablespoon olive oil. Bring to a rolling boil over high heat. Stir once, then reduce the heat to the lowest setting, cover tightly, and simmer for 15 minutes. Do not lift the lid or stir during this time. The trapped steam cooks the grains evenly and keeps them separate instead of gluey. After 15 minutes, remove the pan from the heat and let it rest, still covered, for 10 minutes. Fluff with a fork, not a spoon, to keep the grains intact. If you see liquid pooling after resting, return the covered pan to low heat for 2 to 3 minutes. If the rice is crunchy, add 2 tablespoons water and steam for 5 more minutes. You will know it is ready when it is tender, fluffy, and faintly nutty, with no water visible at the bottom. Using broth adds a savory backbone, but water keeps the flavor neutral so the taco seasoning can shine.

Brown the beef and onion. Heat a 12-inch skillet over medium-high heat and add the remaining 1 tablespoon olive oil. Add the diced onion with a pinch of salt and cook for 3 to 4 minutes, until translucent and lightly golden at the edges. Add the ground beef, breaking it into small, even pieces with a wooden spoon or spatula. Cook for 6 to 8 minutes, stirring occasionally, until no pink remains and the edges are browned. Why this step matters: browning develops deep Maillard flavor, and breaking the meat into small crumbles ensures every bite gets seasoned. A common pitfall is overcrowding the pan; if the beef steams instead of browns, it turns gray and bland. If you use 80/20 beef, drain the excess fat after browning, leaving about 1 tablespoon behind for flavor. The sensory cue is browned, savory crumbles with sweet, soft onions and a rich beef aroma filling the kitchen.
Season the beef. Add the minced garlic and cook for 30 seconds, just until fragrant but not browned. Add the taco seasoning and 1/4 cup water. Stir well, then simmer for 2 to 3 minutes, until the mixture is saucy and aromatic. Why add water? It hydrates the spices, prevents a raw powder taste, and helps the seasoning coat every piece of meat instead of clumping. Blooming the spices in the beef fat unlocks their flavor. The mixture should look rich, reddish-brown, and glossy, smelling of cumin, chili, and garlic. Taste and adjust salt. If you are using homemade taco seasoning, use about 3 tablespoons. This is also the moment to fold in the black beans and corn if you want them warmed together with the beef, stirring and cooking for 2 minutes until heated through.
Warm the beans and corn if you have not already added them. Fold the drained black beans and thawed corn into the beef mixture and cook for 2 minutes, just until hot throughout. The beans add fiber and plant-based protein, while the corn brings a pop of sweetness and color. Keep the mixture on low while you assemble the bowls, but do not let it dry out. If it looks dry, splash in 1 to 2 tablespoons water or beef broth. The sensory cue is gentle steam rising from the skillet and a glossy, cohesive mixture that holds together without being watery. This is a great point to taste once more for salt and spice; if you want more heat, add a pinch of cayenne or a spoonful of salsa.
Build the bowls. Divide the fluffy rice among four wide bowls, using about 1 cup of cooked rice per bowl. Spoon the warm beef, bean, and corn mixture over the rice, dividing it evenly. Then layer on the shredded lettuce, quartered cherry tomatoes, and shredded Mexican-blend cheese. Why this order? The rice acts as a absorbent base for the savory juices, the lettuce adds cool crunch, and the cheese begins to melt slightly from the heat of the beef. Serve immediately so the lettuce stays crisp and the cheese stays soft. If you are feeding a crowd, set up a toppings bar and let everyone build their own bowl. The bowls should look vibrant, with distinct layers of red, green, white, and gold.
Finish with cold, creamy, and acidic toppings. Add a dollop of sour cream or plain Greek yogurt, a spoonful of salsa or pico de gallo, sliced avocado, chopped cilantro, and a lime wedge on the side. Why these toppings matter: the dairy cools the spice, the salsa adds bright acidity, the avocado brings creaminess and healthy fats, and the lime wakes up every other flavor. Squeeze the lime over the bowl just before eating. The final bowl should taste balanced: savory, spicy, fresh, creamy, and slightly tangy. If you like crunch, add crushed tortilla chips or pickled jalapeños. This is the moment to make it your own, but do not skip the lime; it is the secret to a bowl that tastes restaurant-quality.
Store and reheat leftovers safely. Cool any leftovers within 2 hours of cooking. For the best texture, store the rice and the beef mixture in separate airtight containers in the refrigerator for 3 to 4 days. Keep the lettuce, tomatoes, avocado, sour cream, and salsa in separate containers as well. Reheat the rice and beef mixture in the microwave, covered with a damp paper towel, or in a skillet over medium heat until steaming hot. The damp paper towel adds moisture so the rice does not dry out. You can freeze the beef mixture for up to 3 months, and cooked rice also freezes well in portioned bags. Thaw overnight in the refrigerator before reheating. Why separate storage? It prevents the lettuce from wilting and the avocado from browning, so your next bowl tastes nearly as fresh as the first.
For best results
- Rice is the foundation of this bowl, so treat it with respect. Long-grain white rice, jasmine rice, or basmati rice all work well because they stay separate and fluffy. Rinse the rice until the water runs mostly clear, then use a 1:1.5 rice-to-water ratio for a tender but not mushy result. Always bring the liquid to a boil first, then reduce to the lowest possible heat and cover tightly. Resting off the heat for 10 minutes is not optional; it allows the steam to finish the cooking gently. If you are scaling the recipe, do not simply double the water. Cook rice in batches or use a rice cooker for consistent results. A splash of lime juice or a pat of butter stirred into the finished rice adds a subtle richness that makes the bowl feel special.
- Make your own taco seasoning to control sodium, heat, and flavor. A simple blend of 2 tablespoons chili powder, 1 tablespoon ground cumin, 1 teaspoon smoked paprika, 1 teaspoon garlic powder, 1 teaspoon onion powder, 1/2 teaspoon dried oregano, 1/2 teaspoon salt, and a pinch of cayenne or chipotle powder will outperform most packets. Store it in an airtight jar for up to 6 months. When cooking, add the seasoning with a splash of water so it blooms and coats the beef evenly. If you only have a packet, taste it first; some brands are very salty. You can also add a teaspoon of cocoa powder or a tablespoon of tomato paste to the beef for a deeper, mole-like complexity without making it sweet.
- For the juiciest beef, choose the right fat ratio and do not overcook it. Ground beef with 90/10 lean-to-fat is ideal for a healthier bowl, but 85/15 gives more flavor and moisture. Brown the beef in a hot skillet without stirring too often; let it sit for a minute to develop a crust before breaking it up. If you are using ground turkey or chicken, add a tablespoon of olive oil because lean poultry needs added fat to brown well. Always drain excess grease before adding seasoning, but leave a little behind for flavor. A thermometer is your friend: ground beef should reach 160°F (71°C) for safety, but it will continue cooking as it simmers with the seasoning, so pull it off the heat just as it is no longer pink.
- Build a toppings bar if you are serving picky eaters or a crowd. Put the rice, beef mixture, lettuce, tomatoes, cheese, sour cream, salsa, avocado, cilantro, and lime in separate bowls and let everyone assemble their own. This is especially helpful for families with different spice tolerances and dietary needs. It also turns a simple weeknight dinner into a fun, interactive meal. For meal prep, portion the rice and beef mixture into containers, then pack the cold toppings separately. At lunchtime, reheat the rice and beef, then add the fresh toppings. This keeps everything tasting bright instead of soggy. You can also set out corn chips, flour tortillas, or crunchy tostada shells for a taco night mashup.
- Acid, salt, and fat are the three levers that make a taco bowl sing. If your bowl tastes flat, it usually needs one of these: a squeeze of lime, a pinch of salt, or a spoonful of sour cream or avocado. If it tastes too rich, add more salsa or pickled jalapeños. If it tastes too spicy, add a dollop of Greek yogurt or a little more rice. Taste as you go, especially after adding the taco seasoning, because brands vary widely in salt and heat. Fresh cilantro and lime added at the end provide a bright, aromatic finish that no dried spice can replicate. For an extra layer of flavor, quickly pickle thinly sliced red onions in lime juice and a pinch of salt while the beef cooks.
Variations
- Chicken Taco Rice Bowls: Swap the ground beef for 1 pound of boneless, skinless chicken thighs or breasts. Season the chicken with the same taco seasoning and cook it in a skillet with a little olive oil until it reaches 165°F (74°C), then slice or shred it. Chicken thighs stay juicier, while breasts are leaner. You can also use rotisserie chicken for an even faster meal; simply shred it and warm it with the seasoning and a splash of broth. The bowl stays high in protein and takes on the same fresh toppings beautifully.
- Vegetarian Black Bean and Quinoa Bowls: Replace the beef with 2 cups of cooked quinoa and double the black beans. Sauté the onion and garlic in olive oil, add the taco seasoning and a splash of water, then fold in the beans, corn, and quinoa. For a vegan version, skip the cheese and sour cream and use sliced avocado, salsa, and a cashew-lime crema. This variation is packed with fiber and plant protein, and it meal-preps exceptionally well because the flavors deepen overnight.
- Low-Carb Cauliflower Rice Bowls: Substitute the white rice with 4 cups of riced cauliflower, sautéed in a little olive oil until tender and lightly browned. Keep the beef, beans, and toppings the same, or reduce the beans to lower the carbs further. Cauliflower rice releases moisture as it cooks, so sauté it over medium-high heat and let the excess liquid evaporate before building the bowls. This version is lighter but still satisfying, especially with extra avocado and cheese.
- Korean-Inspired Gochujang Taco Bowls: Give the bowl a fusion twist by swapping the taco seasoning for 2 tablespoons gochujang, 1 tablespoon soy sauce, 1 teaspoon sesame oil, and 1 teaspoon brown sugar or honey. Brown the beef with garlic and ginger, then stir in the sauce and simmer until glossy. Top the rice with the beef, quick-pickled cucumbers, shredded carrots, kimchi, and a fried egg. Finish with sliced scallions and sesame seeds. The result is spicy, savory, and completely addictive.
- Breakfast Taco Rice Bowls: Turn this dinner into a hearty breakfast by topping the rice and beef mixture with a fried or scrambled egg instead of lettuce and tomatoes. Add avocado, salsa, and a sprinkle of cheese. You can also crisp leftover rice in a skillet with a little oil before adding the toppings, which gives it a fantastic texture similar to fried rice. This is a great way to use up leftover beef mixture and makes a protein-packed start to the day.
Nutrition
- Calories620 kcal
- Total Fat28g
- Saturated Fat10g
- Cholesterol85mg
- Sodium980mg
- Total Carbohydrates58g
- Dietary Fiber10g
- Sugars7g
- Protein35g