
This simple chicken fajita casserole is made with mild ingredients like tender chicken, soft bell peppers, and melted cheese that picky eaters will enjoy. A quick dinner idea ready in…
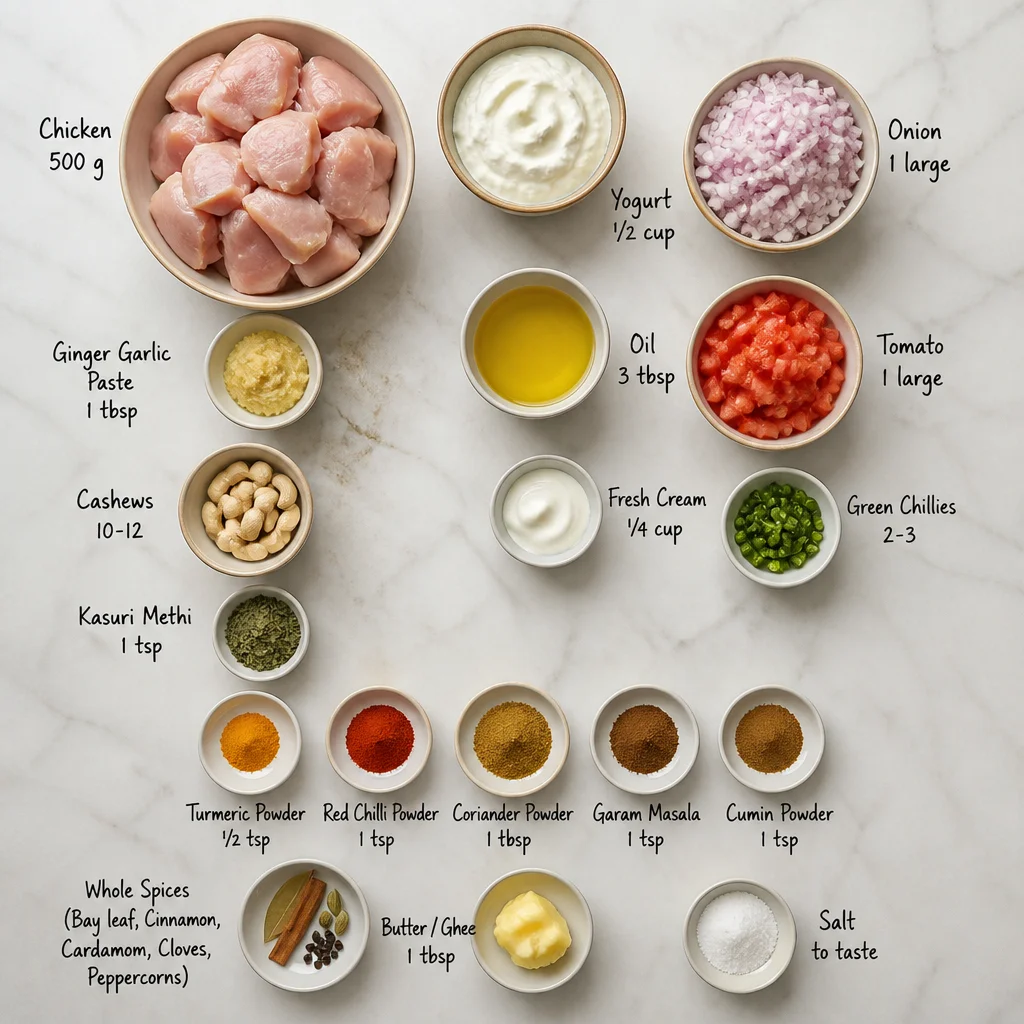
Ingredients
Instructions
Preheat your oven to 375°F (190°C). While the oven heats, prepare all your ingredients: slice the chicken breasts into thin, uniform strips about ½-inch thick. This ensures even cooking and tender results. Thinly slice the onion and all bell peppers into strips of similar size for consistent texture. Mince the garlic finely. Drain and rinse the black beans under cold water to remove excess sodium and the metallic taste from the can. If using frozen corn, thaw it and pat dry to avoid excess moisture in the casserole. Shred the cheeses from a block if possible—pre-shredded cheeses often contain anti-caking agents that can affect melting. Set everything aside within easy reach.
Heat 1 tablespoon of olive oil in a large oven-safe skillet (preferably 12-inch cast iron or stainless steel) over medium-high heat. Once the oil shimmers, add the chicken strips in a single layer without overcrowding—work in batches if necessary to get a good sear. Cook for 3-4 minutes per side until golden brown and cooked through (internal temperature of 165°F/74°C). Use a meat thermometer for accuracy. The chicken should have a nice golden crust from the Maillard reaction, which adds deep flavor. Transfer the cooked chicken to a plate and set aside.

In the same skillet, reduce heat to medium and add the remaining 1 tablespoon olive oil. Add the sliced onion and bell peppers. Sauté for 5-6 minutes, stirring occasionally, until the vegetables are softened and slightly caramelized. The onions should become translucent and the peppers tender but still retaining a slight bite. Add the minced garlic and cook for 30 seconds until fragrant, stirring constantly to prevent burning. The aroma of garlic blooming in the hot oil is a key sensory cue that the flavor foundation is ready.
Return the cooked chicken to the skillet with the vegetables. Sprinkle the chili powder, cumin, smoked paprika, oregano, salt, and black pepper evenly over the mixture. Stir well to coat all ingredients with the spices. Cook for 1-2 minutes, stirring frequently, to toast the spices and meld the flavors. You’ll notice the kitchen filling with a warm, aromatic scent. Add the drained black beans and corn kernels, stirring to combine. Remove the skillet from heat.
In a small bowl, mix the sour cream with 2 tablespoons of water to thin it slightly—this helps it spread evenly and prevents curdling during baking. Pour the sour cream mixture over the chicken-vegetable mixture and stir gently to incorporate. The sour cream adds a creamy, tangy element that balances the spices and makes the casserole extra comforting for picky eaters. Fold in half of the shredded cheeses (about 1 ½ cups) until just combined.
Transfer the mixture to a 9×13-inch baking dish if your skillet isn’t oven-safe, or keep it in the skillet. Spread the mixture into an even layer. Arrange the tortilla wedges over the top in a single layer, overlapping slightly if needed. Sprinkle the remaining shredded cheeses evenly over the tortillas. The tortillas will crisp up in the oven, creating a delicious top crust that mimics the texture of nachos.
Bake the casserole in the preheated oven for 12-15 minutes, or until the cheese is melted and bubbly, and the edges are golden brown. For a more golden top, switch the oven to broil for the last 1-2 minutes, watching carefully to avoid burning. The cheese should be fully melted with a few lightly browned spots. Remove from the oven and let it rest for 5 minutes before serving—this allows the casserole to set and makes serving easier.
Garnish with chopped fresh cilantro and any optional toppings like extra sour cream, salsa, or diced avocado. Serve warm, scooping out portions with a spatula to include the crispy tortilla topping. The casserole is hearty enough to be a complete meal, but you can also serve it with a side salad or Mexican rice for a larger spread. Enjoy!
For best results
- For the most tender chicken, avoid overcooking. Use a meat thermometer to ensure the internal temperature reaches 165°F (74°C) but no higher. Let the chicken rest for a few minutes after cooking before slicing if you prefer larger pieces. Slicing against the grain helps break down muscle fibers, resulting in a more tender bite. If you have time, marinate the chicken strips in a mixture of lime juice, olive oil, and a pinch of cumin for 15-30 minutes—this adds another layer of flavor and helps keep the meat juicy.
- To prevent a soggy casserole, pat all vegetables dry after washing and avoid adding extra liquid. The black beans and corn should be thoroughly drained and patted with paper towels. If using frozen corn, thaw it completely and press out any moisture. Excess water will steam the casserole instead of allowing it to bake, leading to a watery texture. Similarly, if you're using a skillet that isn't oven-safe, transfer the mixture to a baking dish and wipe any moisture from the skillet before pouring.
- Cheese selection matters. For the best melt and flavor, buy blocks of cheddar and Monterey Jack and shred them yourself at home. Pre-shredded cheese is coated with cellulose or starch to prevent clumping, which can inhibit smooth melting. Mild cheddar keeps the dish kid-friendly, while Monterey Jack adds creaminess. For a sharper flavor, substitute half the cheddar with pepper jack for a gentle heat. You can also use a Mexican blend cheese for convenience.
- Tortilla wedges can be swapped for tortilla chips for a crunchier topping. Simply crush a handful of sturdy tortilla chips and sprinkle them over the cheese before baking. Alternatively, use corn tortillas for a gluten-free option—just note that they may not get as crispy. If using flour tortillas, choose fajita-size (6-inch) for the best texture; larger tortillas can be cut into smaller pieces.
- This casserole is highly customizable for picky eaters. If your family dislikes bell peppers, you can reduce the amount or substitute with diced zucchini or mushrooms (which have a milder flavor). For a less spicy version, reduce the chili powder to 2 teaspoons and omit the black pepper. You can also swap the black beans for pinto beans or even diced canned tomatoes (drained) for a different texture. The key is to keep the base mild and let the cheese and sour cream provide comfort.
- Storage and reheating: Leftovers can be stored in an airtight container in the refrigerator for up to 4 days. To reheat, place individual portions in the microwave for 1-2 minutes, or reheat in a 350°F oven for 10 minutes to restore some crispness to the tortilla topping. This casserole also freezes well—assemble it completely but do not bake, wrap tightly in foil and freeze for up to 3 months. Bake from frozen at 375°F for 30-35 minutes, adding 5-10 minutes as needed.
Variations
- Vegetarian Version: Omit the chicken and double the black beans and corn. Add a diced zucchini and a can of drained diced tomatoes with green chilies for extra flavor. You can also incorporate crumbled queso fresco or cotija cheese on top after baking for a tangy finish. This version is still hearty and satisfying, perfect for Meatless Monday.
- Spicy Fajita Casserole: For those who love heat, add 1-2 diced jalapeños (seeds removed for less heat) to the sautéed vegetables. Use pepper jack cheese instead of Monterey Jack, and include a teaspoon of cayenne pepper or chipotle powder in the spice mix. Serve with hot sauce on the side for an extra kick.
- Low-Carb / Keto Adaptation: Replace the tortilla wedges with a low-carb alternative such as sliced zucchini or cauliflower tortillas. Alternatively, skip the tortilla topping altogether and sprinkle crushed pork rinds mixed with cheese for a crunchy, keto-friendly crust. Use full-fat sour cream and cheese, and ensure the beans are omitted or replaced with additional chicken and vegetables.
- Chicken Thigh Version: Boneless skinless chicken thighs can be used instead of breasts for a juicier, richer flavor. Thighs have a higher fat content, which makes them more forgiving and less likely to dry out. Adjust cooking time slightly as thighs may take a couple extra minutes to cook through. Slice them similarly to breasts.
- Creamy Green Chile Chicken Fajita Casserole: Stir in a 4-ounce can of diced green chiles (mild or hot) along with the beans and corn. Replace half the sour cream with cream cheese for an extra creamy texture. This variation adds a subtle Southwestern flair and pairs beautifully with a dollop of guacamole.
Nutrition
- Calories385 kcal
- Total Fat18g
- Saturated Fat9g
- Cholesterol85mg
- Sodium720mg
- Total Carbohydrates28g
- Dietary Fiber5g
- Sugars6g
- Protein32g