

This easy homemade chicken pot pie casserole combines tender chicken, mixed vegetables, and a creamy sauce all baked under a golden, flaky biscuit topping. It's a comforting 30-minute meal perfect…
Ingredients
Instructions
Preheat your oven to 375°F (190°C). While the oven is heating, lightly grease a 9×13-inch baking dish with nonstick cooking spray or a thin layer of butter. This step ensures that the creamy filling doesn’t stick to the dish, making serving easier and cleanup a breeze. If you want extra browning on the bottom, you can use a metal or ceramic dish; glass works too but may require an extra minute or two of baking. Set the prepared dish aside on a baking sheet (to catch any potential overflow from the bubbling filling).
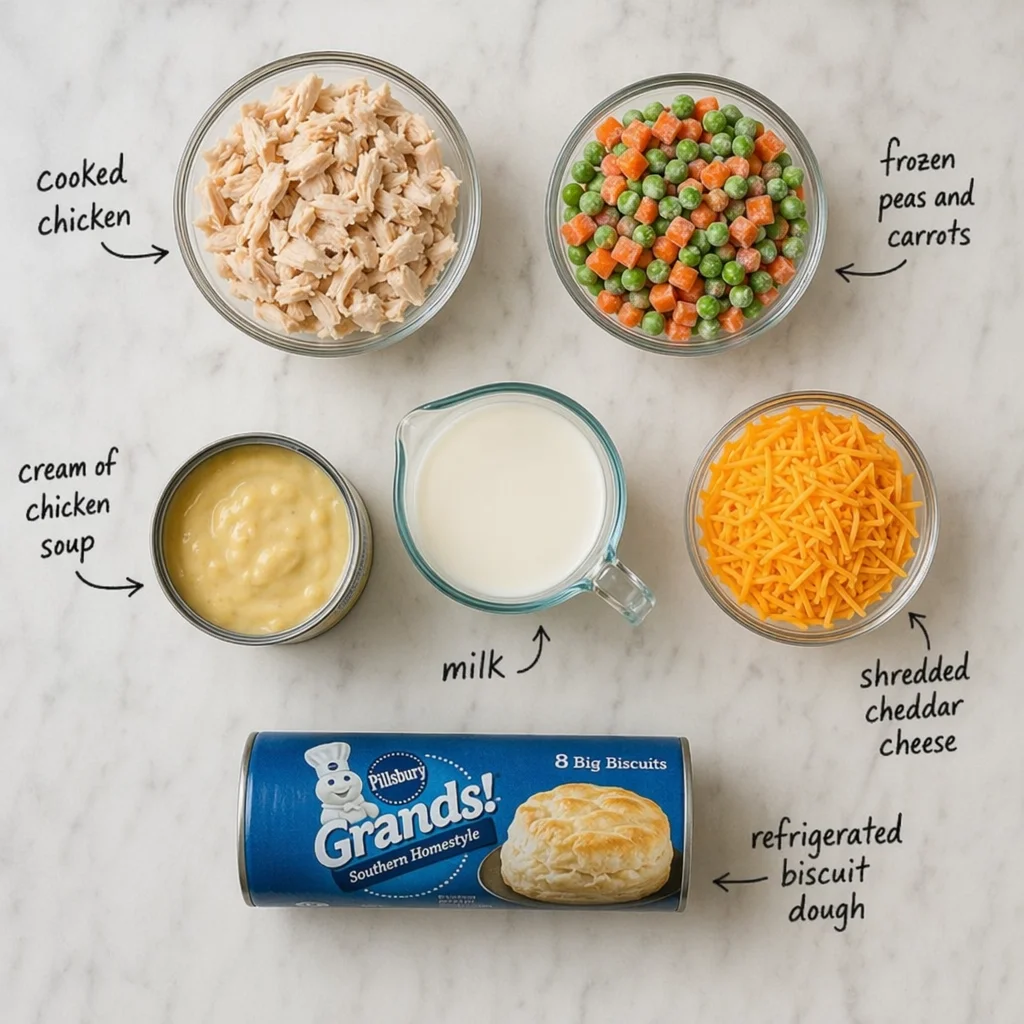
In a large mixing bowl, combine the shredded cooked chicken, frozen mixed vegetables (no need to thaw them first—they will cook perfectly in the oven), condensed cream of chicken soup, whole milk, shredded cheddar cheese, garlic powder, onion powder, and black pepper. Stir everything together with a rubber spatula or wooden spoon until the mixture is uniformly combined. The soup acts as the base of the creamy sauce, while the milk thins it to the perfect consistency—not too thick, not too runny. The cheese adds richness and a savory depth that complements the chicken and vegetables. If you prefer a lower-sodium dish, you can omit the extra salt since the soup already contains a fair amount. Taste the filling at this point if you like (it’s safe to eat since the chicken is already cooked), and adjust seasonings accordingly. The mixture should be thick but spoonable; if it seems too stiff, add an extra tablespoon of milk.

Pour the chicken and vegetable mixture into the prepared baking dish, spreading it evenly with the spatula. Make sure the filling reaches all corners and is level, so that the biscuits bake uniformly on top. The filling should fill about 2/3 of the dish, leaving enough room for the biscuits to rise without overflowing. If you have extra filling, you can mound it slightly in the center—it will settle during baking.
Open the can of refrigerated biscuit dough and separate the 8 biscuits. Arrange them evenly on top of the filling in a single layer. You can place them in a 2×4 grid pattern or scatter them randomly—just make sure they are not overlapping, as they need space to puff up and become golden. For a more rustic look, you can cut each biscuit in half and scatter the pieces, but whole biscuits give a more classic pot pie appearance. Press the biscuits down gently into the filling so they are about halfway submerged; this helps them absorb some of the creamy sauce and become extra tender on the bottom while staying flaky on top.
Brush the tops of the biscuits with the melted butter using a pastry brush. This step is crucial for achieving that beautiful golden-brown, flaky crust. The butter also adds a subtle richness and helps the biscuits crisp up without burning. If you want extra flavor, you can mix a pinch of garlic powder or dried parsley into the melted butter before brushing.
Place the baking dish in the preheated oven and bake for 20-25 minutes, or until the biscuits are golden brown and the filling is hot and bubbly around the edges. To check doneness, insert a knife into the center of the filling—it should come out hot to the touch. The internal temperature of the casserole should reach at least 165°F (74°C) for food safety. If the biscuits are browning too quickly but the filling isn’t bubbling yet, tent the dish loosely with aluminum foil for the last 5 minutes of baking. Every oven is different, so start checking at 18 minutes. The biscuits should be puffed and deep golden, and you may see a few spots of cheese peeking through. Let the casserole rest on a wire rack for 5-10 minutes before serving. This resting period allows the filling to set slightly, making it easier to scoop without turning into a soupy mess. The biscuits will also firm up a bit, giving you that perfect flaky texture.
Scoop generous portions onto plates or into bowls, making sure each serving gets some biscuit and creamy filling. Garnish with fresh chopped parsley or thyme if desired for a pop of color and freshness. This casserole pairs beautifully with a simple green salad or steamed green beans. Leftovers can be stored in an airtight container in the refrigerator for up to 4 days. To reheat, microwave individual portions for 1-2 minutes or reheat in a 350°F oven for 10-15 minutes until warmed through. The biscuits may lose some crispness upon reheating, so for best results, reheat in the oven or an air fryer.
For best results
- For the most flavorful filling, use a rotisserie chicken from the grocery store. The dark meat adds moisture and richness, and the skin can be removed and discarded or chopped and added for extra flavor. Alternatively, you can poach chicken breasts in seasoned broth: simply place boneless, skinless breasts in a pot, cover with chicken broth, add a bay leaf and peppercorns, bring to a boil, then simmer for 12-15 minutes until cooked through. Shred with two forks. This method infuses the chicken with savory flavor that elevates the entire dish.
- Don’t skip the step of brushing the biscuits with melted butter. This not only promotes even browning but also creates a crispy, flaky top that contrasts beautifully with the creamy filling. For an extra golden sheen, you can brush the biscuits halfway through baking as well. If you’re dairy-free, use a plant-based butter or brush with olive oil mixed with a pinch of salt.
- Frozen mixed vegetables are a convenient and cost-effective choice, but you can customize them based on what you have on hand. Try adding diced potatoes (parboiled first), chopped green beans, or even leftover roasted vegetables. If using fresh vegetables, blanch them briefly in boiling water for 2-3 minutes before adding to the filling to ensure they cook through in the 20-minute bake time.
- To make this casserole even more budget-friendly, use homemade cream of chicken soup substitute: melt 2 tablespoons butter in a saucepan, whisk in 2 tablespoons all-purpose flour, cook for 1 minute, then gradually whisk in 1 cup chicken broth and 1/2 cup milk. Simmer until thickened, season with salt, pepper, and poultry seasoning. This yields about 1.5 cups, which is equivalent to one can. Not only does it taste fresher, but it also allows you to control the sodium content.
- If you prefer a from-scratch biscuit topping, you can substitute the refrigerated dough with homemade drop biscuits. Combine 2 cups all-purpose flour, 1 tablespoon baking powder, 1/2 teaspoon salt, 1/4 cup cold butter (cut into small pieces), and 3/4 cup milk. Mix until just combined, then drop spoonfuls over the filling. Bake as directed; the biscuits may need an extra 2-3 minutes. This variation takes the casserole to the next level of homemade goodness.
- Storage tip: This casserole freezes beautifully. Assemble the casserole in a freezer-safe dish (skip the biscuit topping), cover tightly with foil and plastic wrap, and freeze for up to 3 months. When ready to bake, thaw overnight in the refrigerator, then top with biscuits and bake as directed, adding 5-10 minutes to the baking time since the filling will be cold. Alternatively, you can bake the fully assembled casserole, let it cool completely, then freeze individual portions for quick lunches.
Variations
- Vegetarian Version: Omit the chicken and replace it with 2 cups of cooked chickpeas or white beans (rinsed and drained) and 1 cup of sautéed mushrooms. The mushrooms add an umami depth that mimics the savory notes of chicken. Use cream of mushroom soup instead of chicken soup, or make a homemade béchamel with vegetable broth. The result is a hearty, satisfying meatless meal that even carnivores will enjoy.
- Gluten-Free Adaptation: Use gluten-free condensed cream of chicken soup (or make your own using gluten-free flour blend) and gluten-free biscuit dough. Many brands offer gluten-free refrigerated biscuits, or you can make a simple gluten-free drop biscuit using a 1:1 gluten-free flour blend. Ensure all other ingredients (like shredded cheese) are certified gluten-free if needed. The texture will be slightly different but still delicious.
- Spicy Southwest Twist: Add 1 teaspoon chili powder, 1/2 teaspoon cumin, and a 4-ounce can of diced green chiles to the filling. Swap the cheddar cheese for pepper jack, and top with sliced jalapeños before baking. Serve with a dollop of sour cream and fresh cilantro. This variation adds a kick that wakes up the classic comfort dish.
- Crustless Pot Pie (Low-Carb/Keto): Skip the biscuit topping entirely and instead top the filling with a layer of shredded mozzarella or cheddar mixed with crushed pork rinds for a crunchy, low-carb crust. Alternatively, use a cauliflower mash topping: steam and mash 1 head of cauliflower with cream cheese and butter, spread over the filling, and broil until golden. This keeps the carb count low while maintaining the creamy, comforting essence.
- Herb and Lemon Chicken Version: Add 1 tablespoon fresh lemon juice, 1 teaspoon lemon zest, and 1 tablespoon fresh chopped thyme or rosemary to the filling. Replace the cheddar with a milder cheese like mozzarella or provolone. The bright citrus and herbs cut through the richness and make the dish feel lighter, perfect for spring or summer dinners.
- Casserole for a Crowd: Double all ingredients and bake in a 9×13-inch dish plus an 8×8-inch dish, or use a large roasting pan. You may need to increase the baking time by 5-10 minutes. For the biscuit topping, use two cans of biscuit dough and arrange them in overlapping rows. This is perfect for potlucks, holiday gatherings, or large family meals.
Nutrition
- Calories450 kcal
- Total Fat22g
- Saturated Fat9g
- Cholesterol75mg
- Sodium980mg
- Total Carbohydrates38g
- Dietary Fiber3g
- Sugars8g
- Protein28g